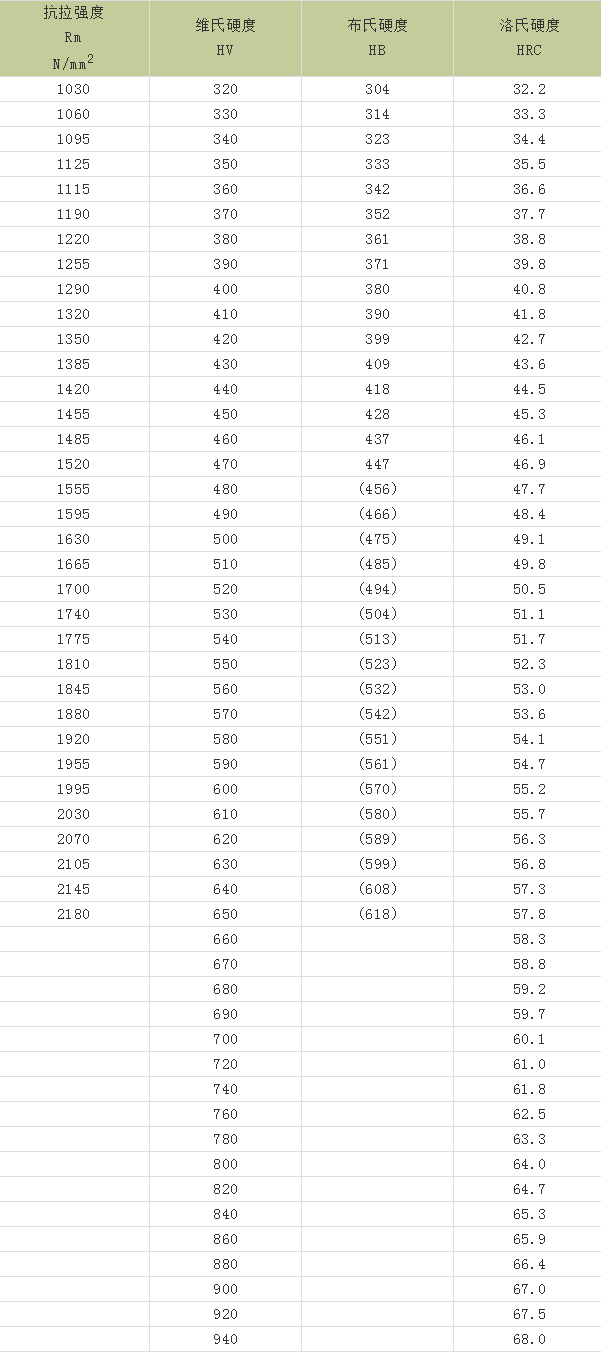
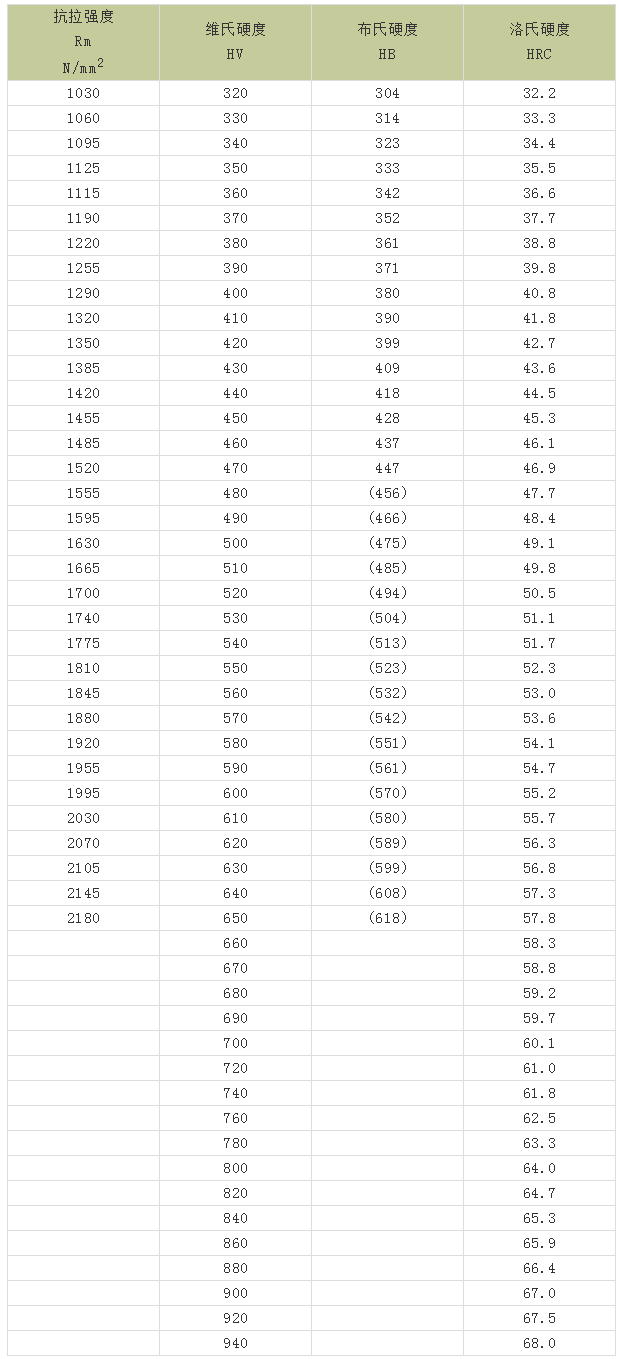
1 hardness introduction Hardness indicates the ability of a material to resist the pressing of a hard object into its surface. It is one of the important performance indicators of metallic materials. Generally, the higher the hardness, the better the wear resistance. Commonly used hardness indexes are Brinell hardness, Rockwell hardness and Vickers hardness. Brinell hardness (HB) A certain size (usually 3000kg) of a hardened steel ball of a certain size (typically 10mm in diameter) is pressed into the surface of the material for a period of time. After the load is removed, the ratio of the load to the area of ​​the indentation is the Brinell hardness value ( HB), the unit is kg/mm2 (N/mm2). Rockwell hardness (HR) When HB>450 or the sample is too small, the Brinell hardness test cannot be used instead of the Rockwell hardness measurement. It uses a diamond cone with a apex angle of 120° or a steel ball with a diameter of 1.59 and 3.18 mm, and is pressed into the surface of the material to be tested under a certain load, and the hardness of the material is determined from the depth of the indentation. According to the hardness of the test material, it is represented by three different scales: • HRA: is a hardness obtained with a 60kg load and a diamond cone indenter for materials with extremely high hardness (such as cemented carbide). • HRB: is a hardened steel ball with a load of 100kg and a diameter of 1.58mm. The hardness is used for materials with lower hardness (such as annealed steel, cast iron, etc.). • HRC: is the hardness obtained with a 150kg load and a diamond cone indenter for materials with high hardness (such as hardened steel). Vickers hardness (HV) Pressing the surface of the material with a load of 120 kg or less and a diamond square cone presser with a apex angle of 136°, the surface area of ​​the material indentation pit is divided by the load value, which is the Vickers hardness HV value (kgf/mm2). Note: A, B, and C in HRA, HRB, HRC, etc. in Rockwell hardness are three different standards, called scale A, scale B, and scale C. The Rockwell hardness test is one of several common indentation hardness tests used today. The initial pressure of all three scales is 98.07N (10kgf), and the hardness value is calculated according to the indentation depth. The ruler A uses a ball cone diamond indenter and is then pressurized to 588.4 N (60 kgf); the ruler B uses a steel ball with a diameter of 1.588 mm (1/16 inch) as the indenter, and then pressurizes to 980.7 N. (100kgf); while the scale C uses the same cone diamond as the scale A as the indenter, but the force after pressurization is 1471N (150kgf). Therefore, scale B is suitable for relatively soft materials, while scale C is suitable for harder materials. Practice has proved that there is an approximate relationship between the hardness values ​​and the strength values ​​of various hardness values ​​of metal materials. Since the hardness value is determined by the initial plastic deformation resistance and the continued plastic deformation resistance, the higher the strength of the material, the higher the plastic deformation resistance and the higher the hardness value. However, the conversion relationship of various materials is not consistent. 2 hardness comparison table According to the German standard DIN50150, the following is a comparison table of tensile strength and Vickers hardness, Brinell hardness and Rockwell hardness of the steel range in the usual range. The hardness test is the simplest and most convenient test method in the mechanical properties test. In order to be able to replace some mechanical properties tests with hardness tests, a relatively accurate conversion relationship between hardness and strength is required for production. Practice has proved that there is an approximate relationship between the hardness values ​​and the strength values ​​of various hardness values ​​of metal materials. Since the hardness value is determined by the initial plastic deformation resistance and the continued plastic deformation resistance, the higher the strength of the material, the higher the plastic deformation resistance and the higher the hardness value. 3 hardness conversion formula 1. Shore hardness (HS) = Boer hardness (BHN)/10+12 2. Shore hardness (HS) = Rockwell hardness (HRC) + 15 3. Boer Hardness (BHN) = Rockwell Hardness (HV) 4. Rockwell hardness (HRC) = Boer hardness (BHN)/10-3 Hardness measurement range: HS<100 HB<500 HRC<70 HV<1300 The following are some of the domestic research results on hardness conversion. 1. Conversion of Knoop hardness and Vickers hardness (1) Based on the same hardness, the two indenters of Knoop's Vickers have equal resistance, and the stresses of the two indenters of Vickers Knoop under load are deduced respectively, and then according to σHK=σHV :HV=0.968HK. This formula is measured under low load and the error is relatively large. In addition, when the hardness value is greater than HV900, this formula has a large error and loses the reference value. (2) After the derivation and correction, the conversion formula of Knoop hardness and Vickers hardness is According to the actual data, the maximum relative conversion error of the formula is 0.75%, which has a high reference value. 2. Conversion of Rockwell hardness and Vickers hardness (1) The Qvarnstorm conversion formula proposed by Hans·Qvarnstorm After the correction, the conversion formula of Rockwell hardness and Vickers hardness is obtained as follows: This formula is scaled by the ferrous metal hardness standard data published in China. The HRC error is basically within the range of ±0.4 HRC, and the maximum error is only 0.9HRC. The calculated HV error is ±15HV. (2) According to the stress σHRC=σHV of different indenters, the formula is obtained by analyzing the curve of Rockwell hardness and Vickers hardness indentation depth. This formula is compared with the national standard experimental conversion value, and the error between the conversion formula and the standard experimental value is ±0.1HRC. (3) According to the actual experimental data, the linear regression method is used to study the conversion of Rockwell hardness and Vickers hardness, and the formula is obtained: This formula has a small range of use and large error, but it is easy to calculate and can be used when the accuracy is not high. 3. Conversion of Rockwell hardness and Brinell hardness (1) Analysis of the relationship between Brinell indentation and Rockwell indentation depth, according to the stress of the indenter σHRC =σHB to get the conversion formula The calculated results are compared with the national standard experimental values, and the error between the conversion formula and the standard experimental value is ±0.1HRC. (2) Get the formula by linear regression method based on actual experimental data The formula error is too large, the use range is small, but the calculation is simple, and can be used when the accuracy is not high. 4. Conversion of Brinell hardness and Vickers hardness The relationship between Brinell hardness and Vickers hardness is also calculated according to σHB=σHV. The conversion result of this formula is compared with the national standard conversion value, and the conversion error is ±2HV. 5. Conversion of Knoop hardness and Rockwell hardness Because the corresponding curve of Knoop hardness and Rockwell hardness is similar to parabola [7], the approximate conversion formula derived from the curve is This formula is more accurate and can be used as a reference. a) The values ​​indicated in bold in this table are consistent with the hardness conversion values ​​in accordance with ASTM-E140 Table 1, from the corresponding SAE-ASM-ASTM Listed by the Federation. b) The values ​​in parentheses are out of range and are for reference only. Directly convert the Rockwell hardness of the workpiece using the Brinell hardness indentation diameter At the production site, the hardness of large quenched parts is often measured using a Brinell hardness tester due to the limitations of the test equipment. If you want to know the Rockwell hardness value of the workpiece, the usual method is to measure the Brinell hardness value and then find the corresponding Rockwell hardness value according to the conversion table. This method is obviously cumbersome. Then, can you calculate the Rockwell hardness value of the workpiece directly based on the indentation diameter of the Brinell hardness tester? The answer is certainly yes. According to the Brinell hardness and Rockwell hardness conversion table, an empirical formula that is simple and easy to remember can be summarized: HRC = (479-100D)/4, where D is a Φ10mm steel ball indenter pressed against the workpiece at 30KN pressure. Indentation diameter measurement on. The error between the calculated value and the converted value is in the range of 0.5 to -1. This formula is very convenient to use in the field. You may wish to give it a try. The wheel Hub Bearing , also called hub assembly, wheel hub unit or hub and bearing assembly, the wheel hub assembly is a crucial part of your steering system contributing to the safe steering and handling of your vehicles.
Dac5378 Automobile Hub Bearing,Qj210Lb Bearing,Cw509024 Bearing,Baq-3954Ab Bearing Shijiazhuang Longshu Mechanical & Electrical Equipment Trading Co., Ltd. , https://www.longsbearings.com


![]()
![]()

![]()
![]()
![]()

Wheel bearing is applied to automobile axle to load and provide accurate guide components for the rotation of the wheel hub, both bearing axial load and radial load. It has good performance to installing , omitted clearance, light weight, compact structure, large load capacity, for the sealed bearing prior to loading, ellipsis external wheel grease seal and from maintenance etc. And wheel bearing has been widely used in cars, in trucks also has a tendency to gradually expand the application.
OUR MAIN PRODUCTS
We manage in all kinds of ball bearings and roller bearings,such as
1.Deep Groove Ball Bearing
2.Self-aligning Ball Bearing
3.Cylindrical Roller Bearing
4.Spherical Contact Bearing
5.Angular Contact Bearing
6.Tapered Roller Bearing
7.Auto Engine Valve
8.Auto Parts Piston And Ring
If you have any request for Clutch Bearing,please chat with us in your free time!!
Packing:
1.Industrial tube packing + cartons + pallets
2.Individual colorful or white box + carton + pallets
3.As the clients' requirement
Shipping
1.Less than 45 KGS, we will send by express. (Door to Door, Convenient)
2.Between 45 - 200 KGS, we will send by air transport. (Fastest and safest, but expensive )
3.More than 200 KGS, we will send by sea. (Cheapest and usual)
Dry goods | Hardness (Brinell Rockwell Vickers) conversion table, super practical!