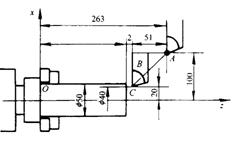
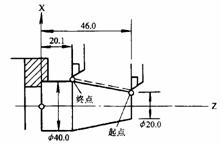
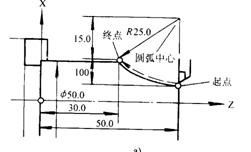
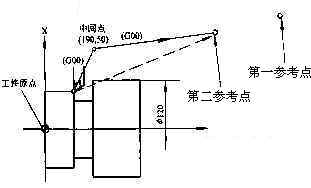
1. F function The F function command is used to control the cutting feed. There are two ways to use it in the program. (1) Feed per revolution Programming format G95 F~ The number after F indicates the feed per revolution of the spindle in mm/r. Example: G95 F0.2 means the feed is 0.2 mm/r. (2) Feed per minute Programming format G94 F~ The number after F indicates the feed per minute in mm/min. Example: G94 F100 means the feed rate is 100mm/min. 2. S function The S function command is used to control the spindle speed. Programming format S~ The number following S indicates the spindle speed in r/min. On machine tools with constant line speed, the S function command also has the following effects. (1) Maximum speed limit Programming format G50 S~ The number following S indicates the maximum speed: r/min. Example: G50 S3000 means the maximum speed limit is 3000r/min. (2) Constant line speed control Programming format G96 S~ The number following S indicates a constant linear velocity: m/min. Example: G96 S150 indicates that the cutting point line speed is controlled at 150 m/min. (3) Constant line speed cancellation Programming format G97 S~ The number following S indicates the spindle speed after the constant line speed control is canceled. If S is not specified, the final value of G96 will be retained. Example: G97 S3000 means that the spindle speed is 3000 r/min after the constant line speed control is canceled. 3. T function The T function command is used to select the tool used for machining. Programming format T~ There are usually two digits after T to indicate the selected tool number. But there are also four digits after T, the first two are the tool number, the last two are the tool length compensation number, and the tool nose radius compensation number. Example: T0303 means to use the No. 3 knife and No. 3 tool length compensation value and tool nose radius compensation value. T0300 means cancel tool compensation. 4. M function M00: The program is paused, and the NC startup command (CYCLE START) can be used to keep the program running. M01: Planned to pause, similar to M00, but M01 can use the machine "optional stop button" to select whether it is valid; M03: The spindle rotates clockwise; M04: the spindle rotates counterclockwise; M05: Spindle rotation stops; M08: the coolant is turned on; M09: Coolant off; M30: The program stops and the program is reset to the starting position. 5. Machining coordinate system setting G50 Programming format G50 X~ Z~ The values ​​of X and Z in the formula are the positions of the starting point relative to the machining origin. The G50 is similar to the G92. In the CNC lathe programming, all X coordinate values ​​use the diameter value as shown. Example: The block for setting the machining coordinates according to the figure is as follows: G50 X128.7 Z375.1 Set the machining coordinate system 6. Quick positioning command G00 The G00 command instructs the machine to move to the next target position at the fastest speed. There is acceleration and deceleration during the movement. This command does not require motion trajectory. Its instruction format: G00 X(U)____ Z(W)____; When programming with absolute values, the values ​​after X and Z are the coordinates of the target position in the workpiece coordinate system. When programming with relative values, the values ​​after U and W are the distance and direction between the current point and the target point. The positioning instructions as shown are as follows: G50 X200.0 Z263.0; Set the workpiece coordinate system G00 X40.0 Z212.0; Absolute value command programming A→C Or G00 U-160.0 W-51.0; relative value command programming A→C Because the feed rates of the X-axis and the Z-axis are different, the combined motion path of the two axes is not necessarily a straight line when the machine executes the fast motion command. Therefore, when using the G00 command, care must be taken to avoid collision between the tool and the workpiece and the fixture. If you ignore this, it is easy to collide, and collisions in fast motion are more dangerous. 7. Linear interpolation command G01 The G01 command commands the machine tool to move linearly from the current position to the target position given by the command at a certain feedrate. Instruction format: G01 X(U)____Z(W)____F ; Where F is the cutting feedrate or feedrate in mm/r or mm/min, depending on the setting of the previous block of the instruction. When using the G01 command, you can use absolute coordinate programming or relative coordinate programming. When using absolute sitting programming, after the CNC system accepts the G01 command, the tool will move to the point where the coordinate values ​​are X and Z; when using the relative sitting programming, the tool moves to the distance from the current point as U and W. Point. The linear motion instructions as shown are as follows: G01 X40.0 Z20. F0.2; Absolute value command programming G01 U20.0 W-25.9 F0.2; relative value command programming 8. Circular interpolation command G02, G03 The circular interpolation command commands the tool to perform circular interpolation motion for the given F feedrate in the specified plane for machining the arc profile. The circular interpolation command is divided into two types: clockwise circular interpolation command G02 and counterclockwise circular interpolation command G03. Its instruction format is as follows: Instruction format for clockwise circular interpolation: G02 X(U)____Z(W)____I____K____F____; G02 X(U)____Z(W)___R___ F____; Instruction format for counterclockwise circular interpolation: G03 X(U)____Z(W)____ I____K____F____;; G03 X(U)____Z(W)___R___ F____; With circular interpolation commands, you can program in absolute coordinates or relative coordinates. In absolute coordinate programming, X and Z are the coordinates of the end point of the arc; in incremental programming, U and W are the distances from the end point relative to the starting point. The position of the center of the circle can be specified by R, or I, K, and R are the arc radius values; I and K are the coordinate increments of the center of the circle on the X and Z axes with respect to the starting point of the arc; F is the tangent along the arc Direction of feed rate or feed rate. When the radius R is used to specify the position of the center of the circle, since there is a possibility of two kinds of arcs from the start point to the end point of the arc at the same radius R, two arcs larger than 180° and smaller than 180°. For the sake of distinction, when the central angle α is ≤180°, it is represented by “+Râ€; when α>180°, “-R†is used. Note: R programming is only suitable for circular interpolation of non-round circles, not suitable for full circle machining. For example, the arc shown in Figure 3-13 is clockwise from the start point to the end point. The pass command can be written as follows: G02 X50.0 Z30.0 I25.0 F0.3; Absolute coordinate, diameter programming, cutting feed rate 0.3mm/r G02 U20.0 W-20.0 I25.0 F0.3; Relative coordinate, diameter programming, cutting feed rate 0.3mm/r G02 X 50. 0 Z30.0 R25.0 F0.3; Absolute coordinate, diameter programming, cutting feed rate 0.3mm/r G02 U20.0 W-20.0 R25.0 F0.3; Relative coordinate, diameter programming, cutting feed rate 0.3mm/r 9. Pause instruction G04 The G04 command is used to pause the feed. The format of the command is: G04 P____ Or G04 X(U)____ The length of the pause time can be specified by the address X(U) or P. The number after P is an integer, the unit is ms; the number after X(U) is the number with a decimal point, and the unit is s. On some machines, the number after X (U) indicates the number of turns of the tool or workpiece. This command can make the tool for short-time non-feed finishing, used in the groove and drill hole, and can also be used for corner track control. For example, when turning the ring groove, if the feed is retracted immediately, the shape of the ring groove is a spiral surface. The workpiece can be idling for a few seconds with the pause command G04, that is, the shape of the ring groove can be rounded, for example, idling 2.5. When s, its program segment is: G04 X2.5 or G04 U2.5 or G04 P2500; G04 is a non-modal command and is valid only in this block. 10. Inch and metric input commands G20, G21 G20 represents the inch input and G21 represents the metric input. G20 and G21 are two codes that can be substituted for each other. The machine tool is generally set to the G21 state before leaving the factory. The parameters of the machine tool are all set in metric units. Therefore, the CNC lathe is generally suitable for the processing of metric-sized workpieces. If a program starts with the G20 command, it means that some data related to the program are It is in English (in inches); if the program uses the G21 command, it means that some data related to the program is metric (in mm). In a program, G20 or G21 commands cannot be used at the same time and must be specified before the coordinate system is determined. The G20 or G21 commands are consistent before and after power failure, that is, the G20 or G21 command is used before the power failure, and is still valid after the next time unless reset. 11. Feed speed dimension control command G98, G99 There are two cutting feed mode setting methods in CNC turning, namely feed rate (feed per revolution) and feed rate (feed mode per minute). (1) Feed rate in mm/r, the instructions are: G99; Feed rate conversion instruction G01X____Z____F____; The unit of F is mm/r (2) Feeding speed in mm/min, the command is: . G98; Feed speed conversion command G01X____Z____F____; The unit of F is mm/min Both G98 and G99 are modal commands that are valid once specified until another mode is specified. The default feed mode for turning CNC systems is the feedrate, ie the feed per revolution mode. The feed per minute mode is only used when milling with power tools. 12. Reference point return command G27, G28, G30 The reference point is a fixed point on the CNC machine that can be moved to that point using the reference point return command. Up to four reference points can be set, and the position of each reference point is set in advance using parameters. The first reference point return must be performed after the power is turned on, otherwise no other operations can be performed. There are two ways to return a reference point: (1) Manual reference point return. (2) Automatic reference point return. This function is used to turn on the power. After the manual reference point return, the automatic reference point return function used in the program to return to the reference point for tool change is used. The automatic reference point return requires the following instructions: (1) Return to the reference point check G27 G27 is used to check if the X and Z axes are correctly returned to the reference point. The instruction format is: G27 X(U)____ Z(W)____ X(U), Z(W) are the coordinates of the reference point. The prerequisite for executing the G27 command is that the reference point must be returned manually after the machine is powered up. When this command is executed, each axis is quickly positioned according to the coordinate value given in the command, and the system internally checks the stroke switch signal of the reference point. If the switch signal is detected to be correct after the positioning is completed, the reference point indicator lights up, indicating that the skateboard is correctly returned to the reference point position; if the detected signal is incorrect, the system alarms, indicating that the reference point coordinate value of the command in the program is incorrect or the machine tool The positioning error is too large. (2) Reference point return command G28, G30 G28 X(U) ____ Z(W) ____; The first reference point returns, where X(U) and Z(W) are the intermediate points when the reference point returns, X and Z are absolute coordinates, and U and W are relative coordinates. . The reference point return process is shown in Figure 3-14. G30 P2 X(U)____ Z(W)____; The second reference point returns, P2 can be omitted G30 P3 X(U)____ Z (W)____; third reference point return G30 P4 X(U)____ Z(W)____; Fourth reference point return The meanings of X(U), Z(W) in the second, third, and fourth reference point returns are the same as those in G28. As shown in Figure 3-14, the tool returns to the reference point. The tool returns to the reference point from the current position through the intermediate point (190, 50). The command is: G30 X190 Z50; G30 U100 W30; As shown by the dotted line in Figure 3-14, if the reference point returns without passing through the intermediate point, the tool will collide with the workpiece, causing an accident. Stainless Steel Wine Rack/holder Wine Bottle Rack,Metal Wine Rack,Wine Display Rack,Wine Rack Holder,Honeycomb Wine Rack Shenzhen Lanejoy Technology Co.,LTD , https://www.baking-rack.com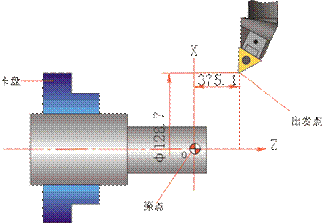
Introduction to common instructions for CNC lathe programming